
This guide shows you how to send contacts from Emarsys or Salesforce Marketing Cloud (SFMC) to a One-Shot.
You create the One-Shot in the optilyz dashboard, not in your marketing tool. In the marketing tool, you only choose the One-Shot and send contacts to it. In optilyz, each contact becomes a recipient.
Before you start
- Your optilyz account is connected to Emarsys or SFMC. For the setup inside the marketing tool, see Emarsys or Salesforce Marketing Cloud. These articles describe automations. For a One-Shot, use them only for the steps inside the marketing tool. Do not create anything new there.
- You have a One-Shot with the status Awaiting Recipients. To get there, finish the setup steps and click Start collecting recipients. See One-Shot: step-by-step guide.
- Your One-Shot has a name that you can easily find. The marketing tool shows your One-Shot by its name, next to your automations.
Do the steps in this order. Configure the data mapping first. Send contacts after that.
1. Configure the data mapping
The data mapping tells optilyz which field in your marketing tool fills which address field and personalisation field.
Configure it before you send any contact, also a test contact. When a data mapping exists and the first recipient is in the One-Shot, you cannot change the data mapping anymore. This is true for recipients from all sources: marketing integration, API and CSV.
Open your One-Shot in the dashboard.
Go to the Data mapping section.
Click Configure data mapping. A panel opens on the side.
SFMC: first choose the data extension that holds your contacts. Until you do, the panel shows Select a data extension to map its fields.
Under Your file contains:, choose how your data holds the name and the street:
- Name: First name and last name in separate fields or Name as a full name in the same field.
- Address: Street and house number in separate fields or Street and house number in the same field.
Your choice sets which address fields are required. A red star marks a required field.
Choose the field from your marketing tool for each address field.
Under Personalisation fields, choose the fields for your personalisation. To add one more personalisation field, click Map another field.
Emarsys only: to use an Emarsys personalisation token instead of a field, click {{ esl }} next to the field. Enter the token in ESL token and click Save.
Click Done.
optilyz saves each choice at once. Done only closes the panel.
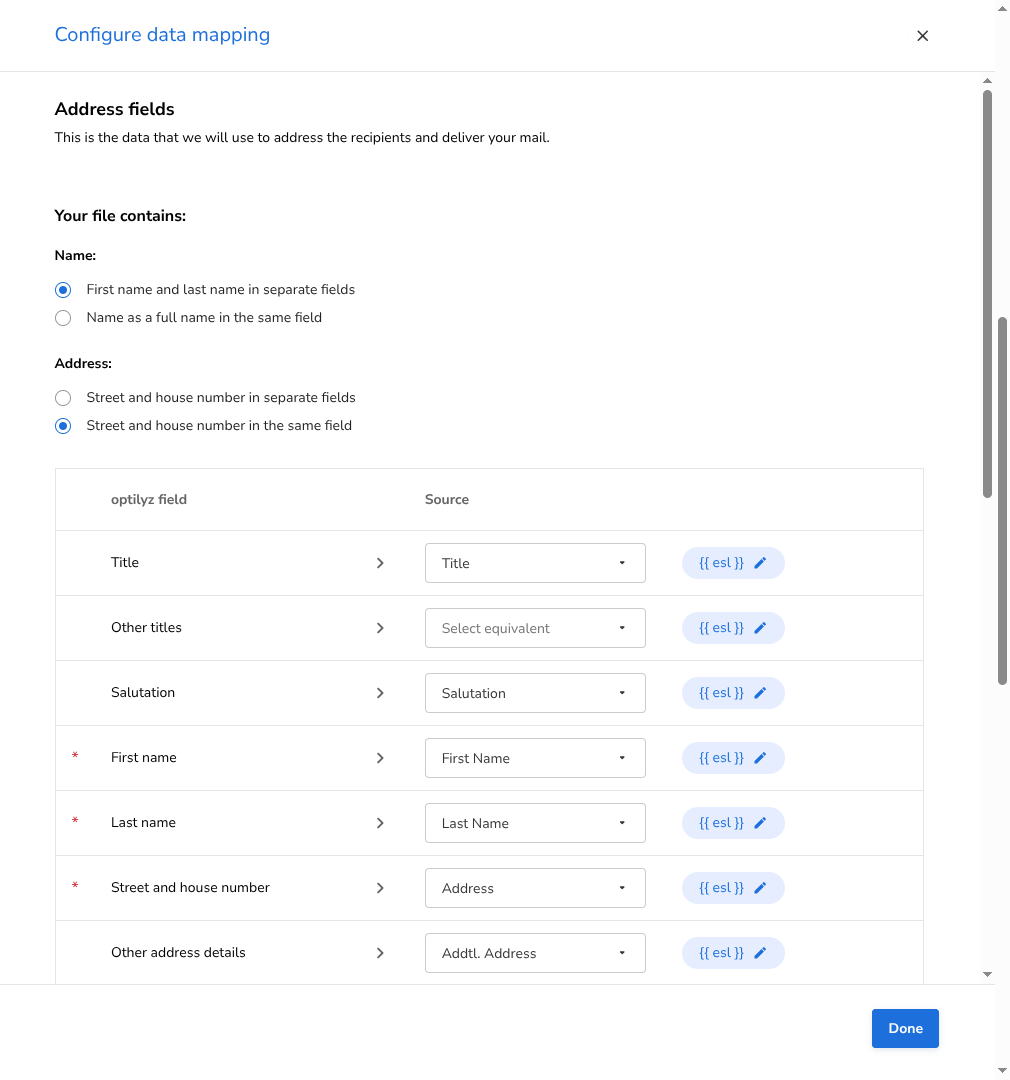
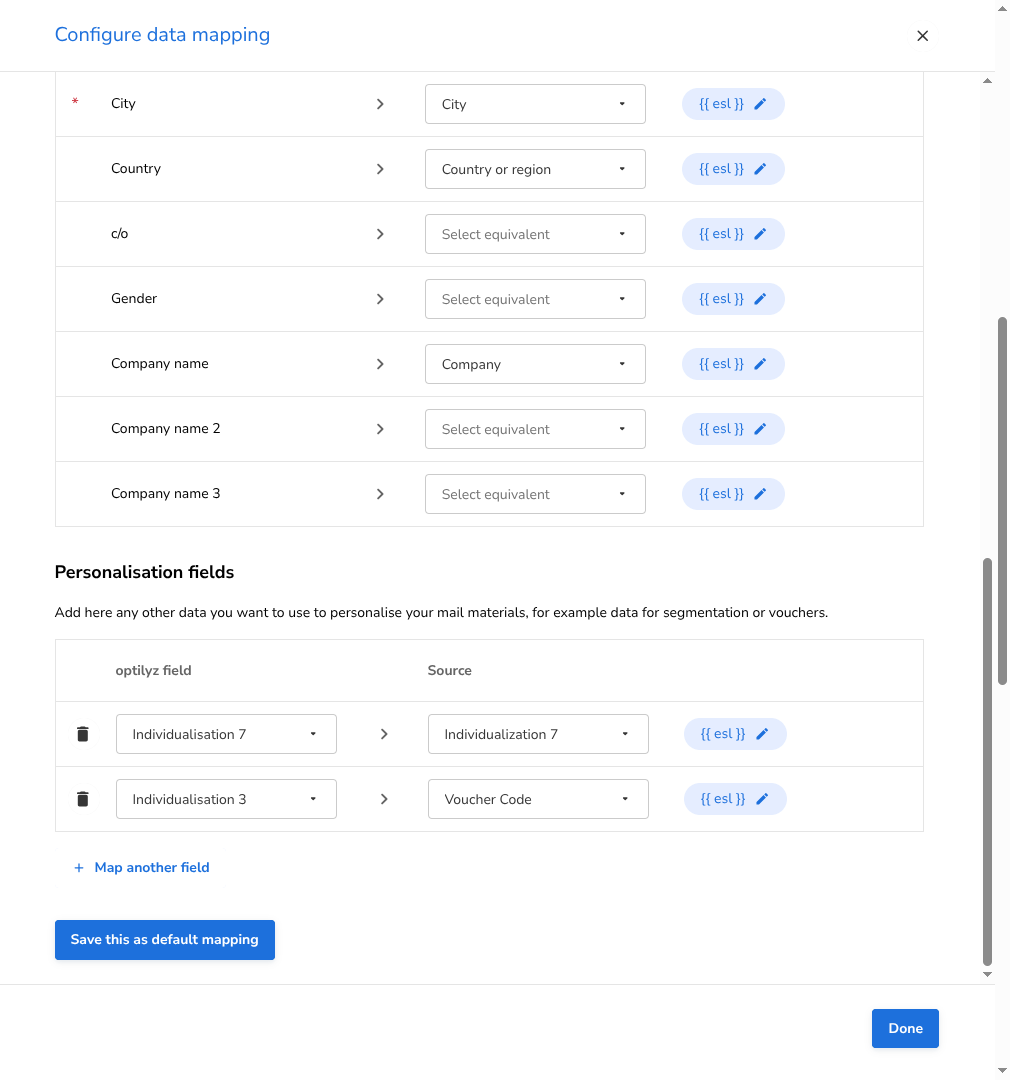
If your account has a default data mapping, a new One-Shot starts with it. The section then shows the data mapping at once, and the button reads Edit data mapping. Check every field, and correct the ones that do not fit this mailing. Save this as default mapping at the bottom of the panel changes the default for your account, not only for this One-Shot.
When the data mapping is done, the section shows it, and the button reads Edit data mapping.
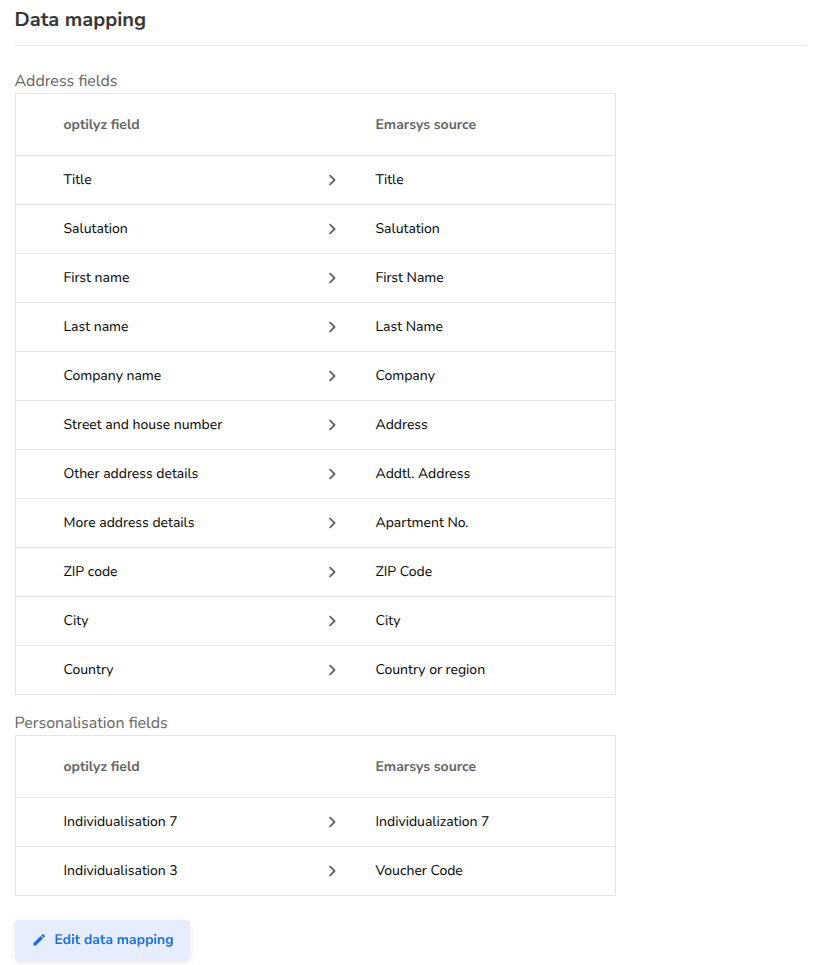
The Data mapping section shows only when your account is connected to Emarsys or SFMC.
2a. Send contacts from Emarsys
Emarsys does not use the One-Shot ID. You choose the One-Shot by its name.
- In Emarsys, set up your program as the Emarsys article describes.
- Where you choose the optilyz automation, choose the entry for your One-Shot instead.
Emarsys shows one entry for each variation of your One-Shot. The entry name has this form:
<One-Shot name> [VARIATION A - <variation name>], when you gave the variation a name.<One-Shot name> [VARIATION A - visuals: "<file name>"], when the variation has no name.
Choose the entry for the variation that these contacts get.
Emarsys lists a One-Shot only while it has the status Awaiting Recipients. A draft or a booked One-Shot is not in the list.
2b. Send contacts from Salesforce Marketing Cloud
SFMC does not use the One-Shot ID. You choose the One-Shot by its name.
- In Journey Builder, add the optilyz activity Send Direct Mail to your journey. The Salesforce Marketing Cloud article describes where to find it.
- In the activity, choose your One-Shot by its name.
- Choose which variation your contacts get: Any, randomly assigned or Let me choose one.
The list in the activity also shows booked One-Shots. Choose a One-Shot that shows Awaiting Recipients in the optilyz dashboard.
3. Check that the contacts arrived
- Open the One-Shot page.
- Look at the Recipient validation section. Click Refresh if necessary.
- Make sure that the number in … awaiting validation went up.
If optilyz refuses a contact, your marketing tool gets the error. The dashboard shows nothing. So check the count after the first contacts.
4. Validate the recipients and book
- When all contacts are sent, stop your Emarsys program or your SFMC journey.
- Click Validate recipients.
- When the validation is finished, choose the postal handover date and click Book.
optilyz reads the address data from your marketing tool when you click Validate recipients, not when the contact arrives. Keep the contacts and their data in your marketing tool until the validation is finished.
If more contacts arrive after a validation, Book is disabled again. The tooltip reads You can book once every recipient has been validated. Click Validate recipients again.
The step-by-step guide explains validation, the delivery timeline and booking in detail.
Troubleshooting
| What you see | Cause | What to do |
|---|---|---|
| You have pushed recipients from your marketing integration. Configure your data mapping so they can be validated. | Contacts arrived, but the One-Shot has no data mapping. | Click Configure data mapping and configure it. |
| After Validate recipients: Data mapping is required in order to validate recipients from your marketing integration. | Contacts wait, but the One-Shot has no data mapping. The validation does not start for any recipient, also not for API and CSV recipients. | Configure the data mapping. Then click Validate recipients again. |
| Edit data mapping is disabled. The tooltip reads You have pushed recipients, so your data mapping is now fixed. Edit your One-Shot to change it. This deletes all recipients you have pushed. | Recipients are in the One-Shot, so the data mapping is locked. | To change the data mapping, click Edit. This deletes all recipients. Then send all contacts again. |
| Configure data mapping or Edit data mapping is disabled. The tooltip reads You cannot change your data mapping while a validation is in progress | A validation is in progress. | Wait until the validation is finished. |
| Your One-Shot is not in the Emarsys list | The One-Shot does not show Awaiting Recipients. It is a draft or it is booked. | Open the One-Shot. If it is a draft, finish the setup steps and click Start collecting recipients. |
| Your One-Shot is not in the SFMC activity | The One-Shot is a draft. | Finish the setup steps and click Start collecting recipients. |
| … awaiting validation does not go up | The One-Shot is not Awaiting Recipients, or you chose a different One-Shot in the marketing tool. | Check the status next to the One-Shot name. Check which One-Shot you chose in the marketing tool. Check the errors in your marketing tool. |
| After validation: Recipients from the following sources couldn't be validated: with Marketing integration | optilyz could not validate the contacts from your marketing tool. | Check the data mapping. Make sure the contacts are still in your marketing tool. Click Validate recipients again. If the message stays, contact Customer Success. |
| Book is disabled with You can book once every recipient has been validated. | Contacts arrived after the last validation, or contacts wait for a data mapping. | Configure the data mapping if necessary. Click Validate recipients. |
Good to know
- You cannot create a One-Shot in Emarsys or SFMC. Create it in the optilyz dashboard.
- Configure the data mapping before the first contact arrives. After that, only Edit can change it, and Edit deletes all recipients.
- After you click Book, the One-Shot takes no more recipients. Contacts that arrive after you click Book are not in the mailing. Stop your program or journey before you book.
- Edit deletes all recipients and returns the One-Shot to draft. While the One-Shot is a draft, it takes no contacts. After the edit, click Start collecting recipients again. Then send all contacts again.
- A One-Shot keeps the marketing integration that it was mapped with, also if your account changes to a different one later.
- The One-Shot page shows one total for all sources. It does not show a separate count for contacts from your marketing tool.
- You can also send recipients by API or upload CSV files to the same One-Shot. The data mapping is then still required for the contacts from your marketing tool.
- optilyz supports Emarsys and Salesforce Marketing Cloud as marketing integrations.