
This guide shows you how to send recipients from your own system to a One-Shot through the optilyz API.
You create the One-Shot in the optilyz dashboard. The API only sends recipients to it.
Before you start
- You have a One-Shot with the status Awaiting Recipients. To get there, finish the setup steps and click Start collecting recipients. See One-Shot: step-by-step guide.
- You have an API key. You create it yourself in the dashboard under Settings. See Create an API key.
- You know how to send HTTP requests from your system. The optilyz API reference describes all fields.
1. Find the One-Shot ID
Open your One-Shot in the dashboard. The blue box under the name shows One-Shot ID: …. Copy this ID.
The ID is also the last part of the page address: /one-shot/<One-Shot ID>.
The ID shows only after you click Start collecting recipients. Before that, the One-Shot is a draft and cannot receive recipients.

2. Find the variation numbers
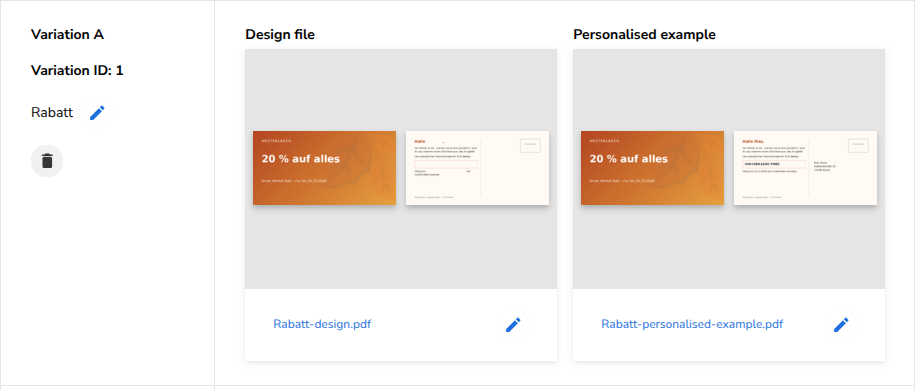
Each recipient needs a variation number. Variation A is 1, Variation B is 2, and so on.
On the One-Shot page, the Visuals section shows the number for each variation as Variation ID: 1, Variation ID: 2. The setup step Upload your visuals shows the same numbers. If your account is also connected to a marketing integration, both show only the letters. Count from A = 1.
3. Send the recipients
A One-Shot has no endpoint of its own. You use the recipient endpoint for automations and put the One-Shot ID where the automation ID goes:
POST https://www.optilyz.com/api/v3/automations/<One-Shot ID>/recipients
- Send 1 to 2,500 recipients in one request. For more recipients, send more requests.
- Send the header
Authorization: Bearer <your API key>. - Send the header
Content-Type: application/json. - Each recipient needs
addressandvariation. - The address needs
zipCode,city, a name (lastNameorfullName, orcompanyName1) and a street (streetwithhouseNumber, oraddress1). The API reference lists all fields, also the fields for personalisation.
Example with one recipient. It uses the One-Shot ID from the picture in step 1. Use the ID of your own One-Shot:
curl -X POST "https://www.optilyz.com/api/v3/automations/6abb85e80d6ca884758c7c2f/recipients" \
  -H "Authorization: Bearer YOUR_API_KEY" \
  -H "Content-Type: application/json" \
  -d '{
    "addresses": [
      {
        "address": {
          "firstName": "Erika",
          "lastName": "Musterfrau",
          "street": "Beispielstraße",
          "houseNumber": "12",
          "zipCode": "10115",
          "city": "Berlin",
          "country": "Deutschland"
        },
        "variation": 1
      }
    ]
  }'
The success response is:
HTTP/1.1 201 Created
{
  "code": "RecipientReceived",
  "message": "Recipients successfully received."
}
To send one recipient per request, you can also use the endpoint for one recipient: POST https://www.optilyz.com/api/v3/automations/<One-Shot ID>/recipient. See Enqueue one recipient.
For authentication details, see the introduction of the API reference.
4. Check that the recipients arrived
A 201 response means "received". It does not mean "added to your One-Shot". optilyz adds the recipients a short time later.
optilyz does not add recipients in these cases, and you get no error:
- You sent them before you clicked Start collecting recipients.
- You sent them while you edit the One-Shot (after Edit and before you click Start collecting recipients again).
- You sent them after you clicked Book.
- You used a wrong ID, or the ID of a One-Shot in a different account.
So after your first request, do this check:
- Open the One-Shot page.
- Look at the Recipient validation section. Click Refresh if necessary.
- Make sure that the number in … awaiting validation went up.
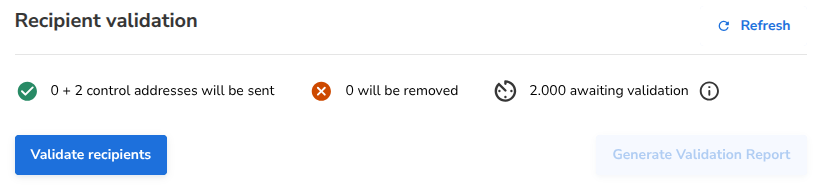
If the number does not go up, see "Troubleshooting" below.
5. Validate the recipients and book
- When all recipients are sent, stop sending.
- Click Validate recipients.
- When the validation is finished, choose the postal handover date and click Book.
If you send more recipients after a validation, Book is disabled again. The tooltip reads You can book once every recipient has been validated. Click Validate recipients again.
The step-by-step guide explains validation, the delivery timeline and booking in detail.
Troubleshooting
| What you see | Cause | What to do |
|---|---|---|
201, but … awaiting validation does not go up | The One-Shot does not show Awaiting Recipients: it is a draft, you are editing it, or it is booked. Or the ID is wrong. | Check the status next to the One-Shot name. Check the ID in the blue box. Then send the recipients again. |
400 with "code": "InvalidArgumentError" | The request body is not correct, for example variation is missing or 0, or addresses is empty. | Read validationErrors. Each entry shows the path of the wrong field, for example /addresses/0/variation. Correct the field and send again. |
413 with "code": "PayloadTooLargeError" | The request has more than 2,500 recipients. | Split the recipients into requests of 2,500 or fewer. |
401 or 403 | The API key is missing, wrong, expired or revoked. | Check the Authorization header. It must be Bearer <your API key>. If the key expired or was revoked, create a new one. See Create an API key. |
415 | The content type is not JSON. | Send Content-Type: application/json. |
500 with "code": "ServerError" | A problem on the optilyz side. | Wait and send the same request again. |
| The request times out | You do not know if optilyz received the recipients. | Check … awaiting validation before you send again. A second request adds the same recipients a second time. |
| After validation: Recipients from the following sources couldn't be validated: with API | optilyz could not validate your API recipients. | Click Validate recipients again. If the message stays, contact Customer Success. |
| Book is disabled with You can book once every recipient has been validated. | You sent recipients after the last validation. | Click Validate recipients. |
Good to know
- You cannot create a One-Shot with the API. Create it in the dashboard. Then send recipients to it.
- After you click Book, the One-Shot takes no more recipients. Stop sending before you book.
- Edit deletes all recipients that you sent and returns the One-Shot to draft. After the edit, click Start collecting recipients again. Then send all recipients again.
- The API does not refuse duplicate recipients. Your validation rules decide if duplicates are removed during validation.
- If you send a variation number that the One-Shot does not have, the request still gets
201. The recipient shows an error after the validation. - The One-Shot page shows one total for all sources. It does not show a separate count for API recipients.
- You can send recipients by API and also upload CSV files to the same One-Shot. See Upload recipients from CSV files.
- If your account is also connected to Emarsys or Salesforce Marketing Cloud, and contacts from there wait without a data mapping, Validate recipients does not start. This also holds your API recipients. See Send recipients from Emarsys or Salesforce Marketing Cloud.